
Recurring billing and licensing updates
Guide reviewed October 7, 2026. Use the matching package for your installed nopCommerce version.
Core owns the shared Recurring Billing entry point for Stripe/PayPal workflows. It provides renewal dispatch, retry backoff, health review, and manual retry/pause/resume controls. Provider-specific eligibility and payment configuration still apply.
- Before enabling Core's renewal dispatcher, disable the legacy Stripe renewal-generation task. Keep Stripe's pending-renewal processor when that provider requires it.
- Review the due date, existing payment reference, provider result, and current schedule before manual retry. A retry does not bypass every eligibility or duplicate-payment guard.
- After deploying Core, restart every application instance and use compatible dependent plugin assemblies.
Licensing grace requires a previously validated active key and cannot exceed the allowance from the license server. Changing or clearing a key removes its old entitlement. Development-domain support does not override an explicitly invalid or deactivated license.
Saved PayPal accounts and recurring reference transactions require PayPal's approval for the merchant application. Confirm that approval before enabling those flows.
Overview
eStoreware Core is installed before other eStoreware plugins. It provides one central administration area for opening installed tools, reviewing license status, and controlling access.
Central dashboard
Open management and configuration pages for the eStoreware plugins installed on the current site.
Shared licensing
Activate and validate each installed plugin from one licensing screen.
Permission controls
Limit administrative and customer-facing functionality by nopCommerce customer role.
Customer portal
Connect administrators with package downloads, activated domains, and license details.
Requirements
- A supported nopCommerce installation and the matching plugin package version.
- Administrator access to upload and install local plugins.
- Write access to the nopCommerce plugin directory and application data folders.
- Outbound HTTPS access for online activation and validation.
- A valid license key for each paid eStoreware plugin being activated.
Install eStoreware Core
- Back up the website files and database before installing or updating plugins.
- Sign in to nopCommerce administration and open Configuration → Local plugins.
- Use the upload option to upload the eStoreware package, or copy the extracted plugin folders into the website’s Plugins directory.
- Reload the plugin list so nopCommerce detects the new folders.
- Locate eStoreware Core and select Install.
- Restart the application when prompted. If the package includes another eStoreware plugin, install it after Core.
- Open the new eStoreware administration menu and confirm that the Dashboard and Licensing pages load.
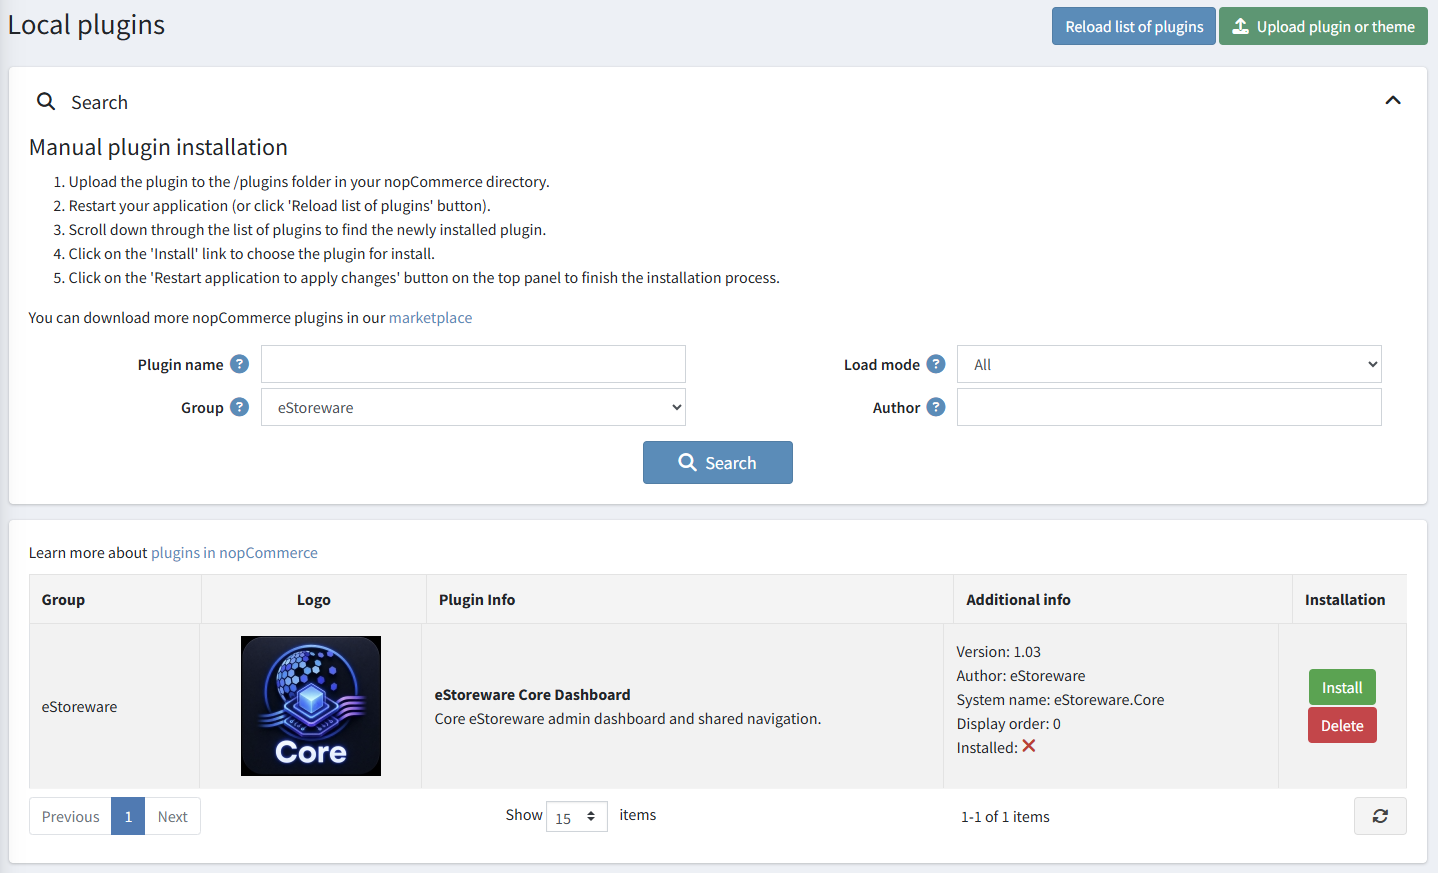
Package containing Core and another plugin
Supported eStoreware packages may include both the free Core plugin and the purchased plugin. Install Core first, restart or reload when required, and then install the dependent plugin.
Confirm the installation
- The eStoreware menu appears in administration.
- The dashboard loads without an application error.
- The Licensing page lists only the eStoreware plugins installed on this website.
- The dependent plugin’s Manage or Configure action is available.
Use the Core Dashboard
Open Administration → eStoreware → Dashboard. The page is designed to show the eStoreware tools available in the current installation rather than every plugin in the catalog.
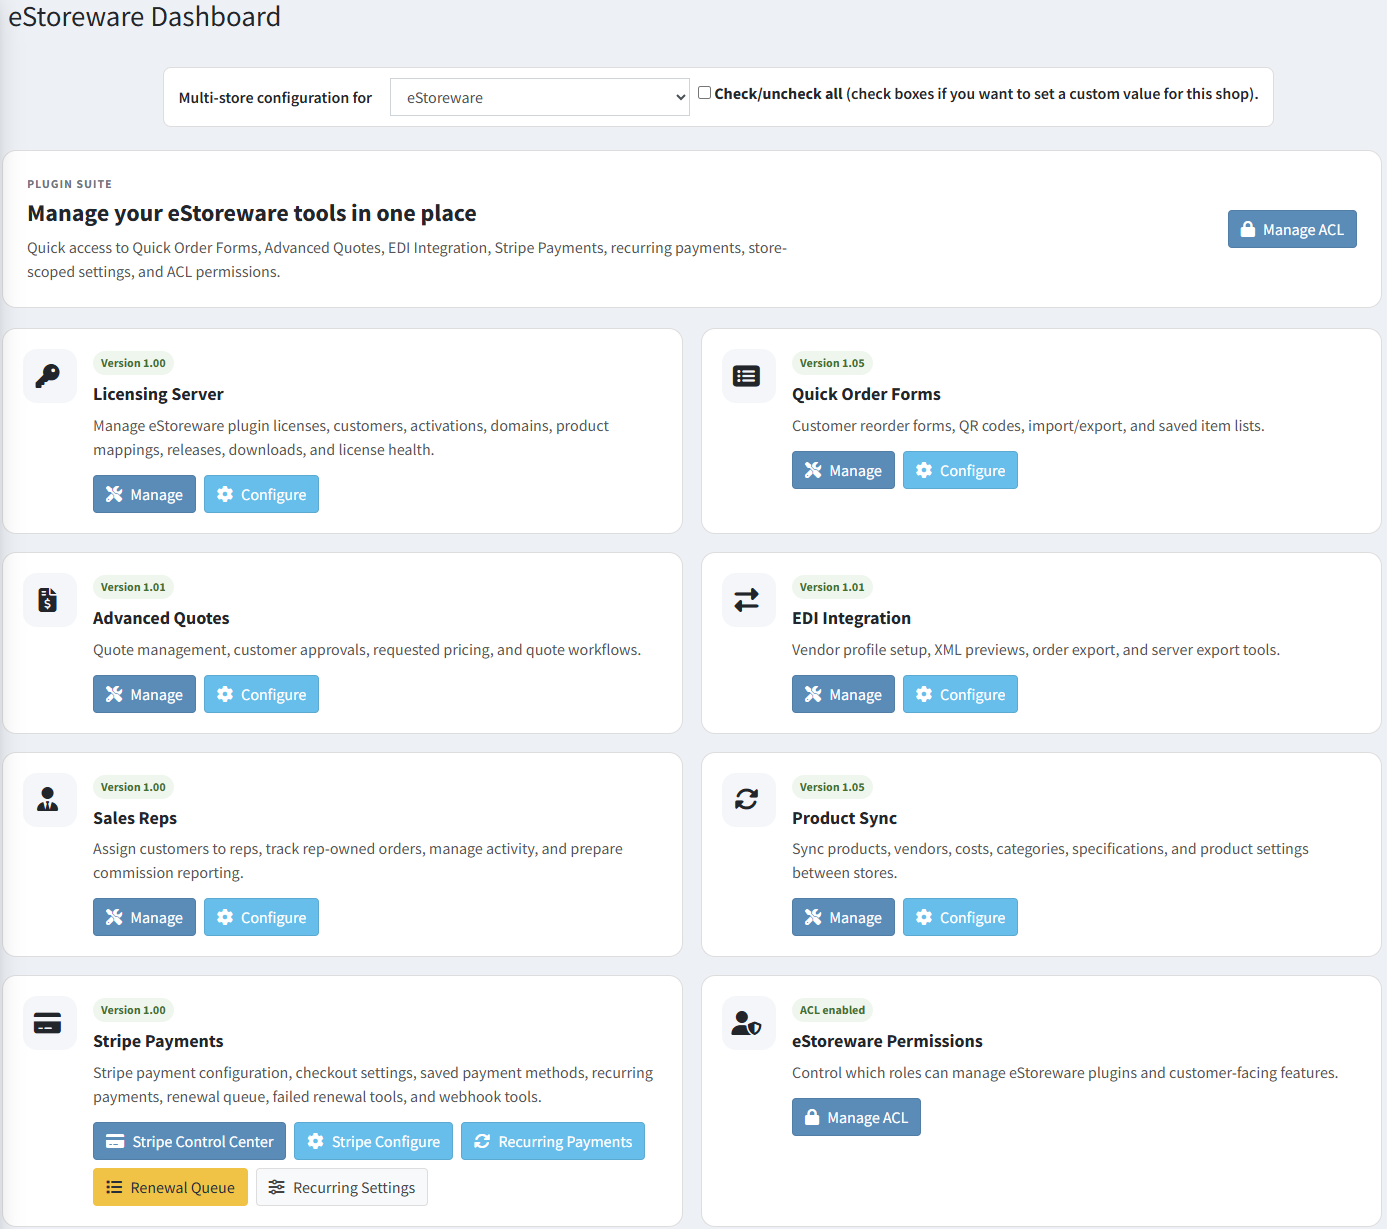
| Dashboard action | Purpose |
|---|---|
| Manage | Opens the plugin’s operational screen, such as quick order forms, recurring payments, quotes, or sync profiles. |
| Configure | Opens the plugin’s store settings or nopCommerce configuration page. |
| Licensing | Opens activation, validation, status, and local license controls. |
| Manage ACL | Opens permission controls for administrative and customer-role access. |
| Customer Portal | Opens the eStoreware customer area for licenses, downloads, and activated domains. |
Activate and validate plugin licenses
- Open Administration → eStoreware → Licensing.
- Select the installed plugin from the plugin dropdown.
- Enter the license key issued through the eStoreware customer account or order.
- Select Activate Online to apply the license to the installation and current domain.
- Select Validate License to refresh the current status, licensed domain, usage, expiration information, and warning message.
- Confirm the status shows Active for the current domain.
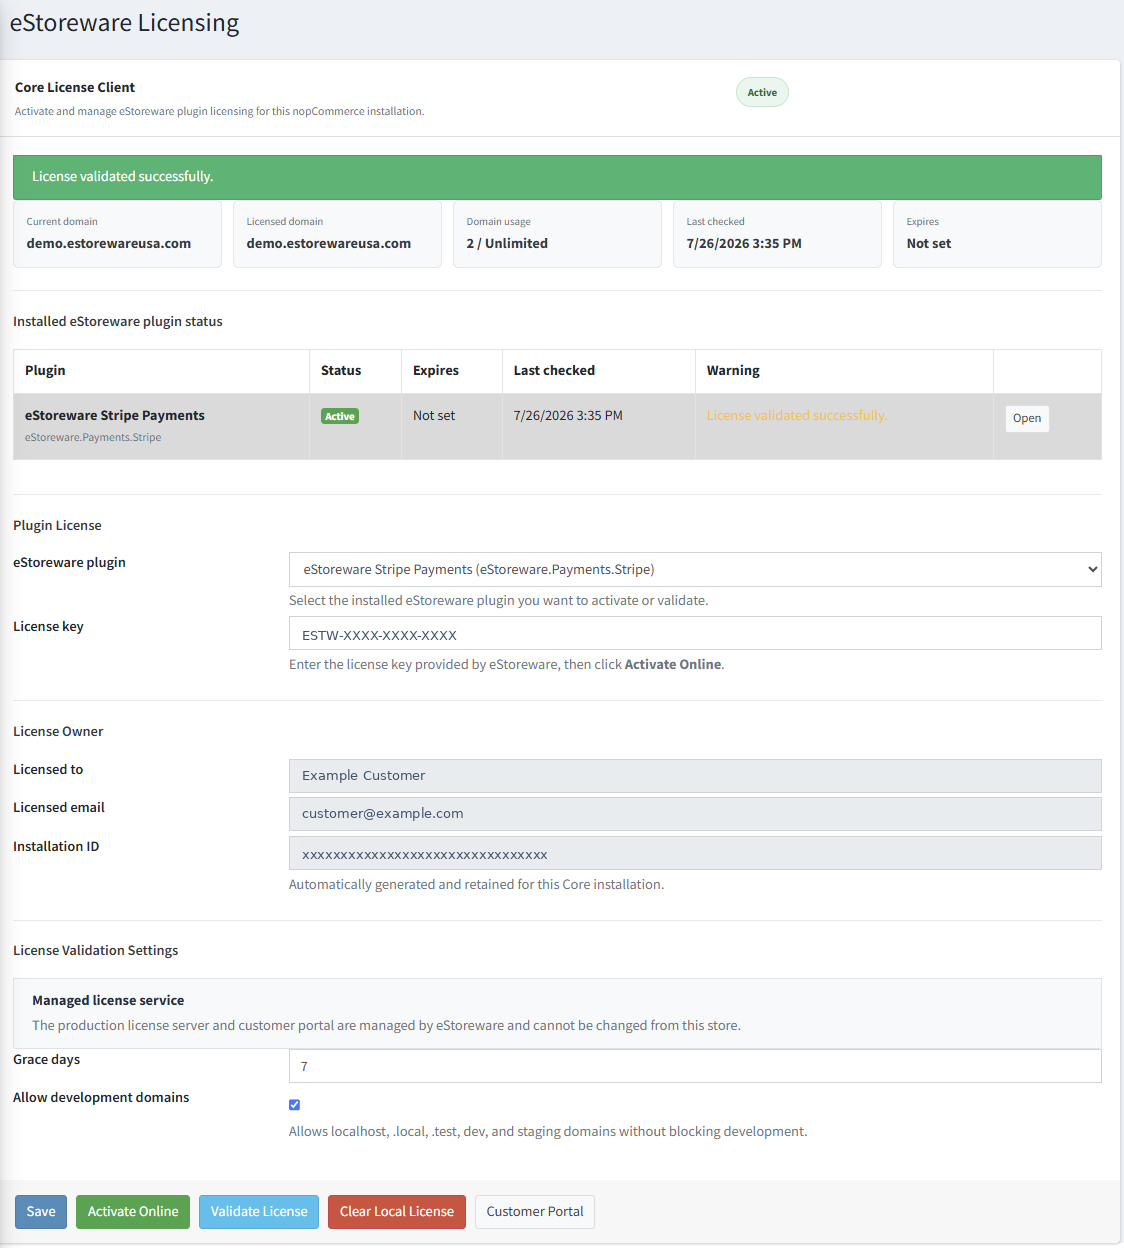
| Control or status | Meaning |
|---|---|
| Activate Online | Applies a key to the installation or activates the selected plugin for the first time. |
| Validate License | Checks the current license and refreshes the locally stored result without creating a new license. |
| Clear Local License | Removes only the cached license data from this nopCommerce installation so it can be activated again cleanly. |
| Active | The plugin was accepted for the current installation and domain during the latest validation. |
| NotConfigured | The plugin has not completed activation or validation on this installation. |
| Never checked | No completed validation result is stored locally for the selected plugin. |
| Grace days | A temporary allowance for a previously valid license when the online validation service cannot be reached. |
Manage permissions and customer roles
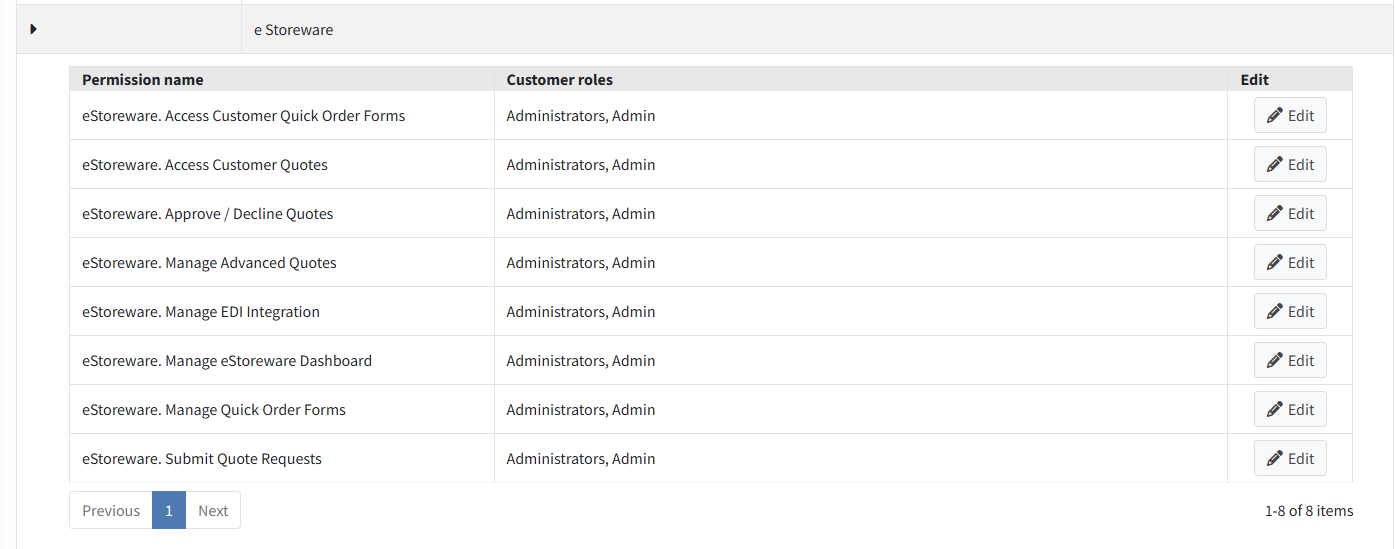
Use Manage ACL from the eStoreware dashboard or plugin administration area to decide which nopCommerce customer roles can access protected management or customer-facing features.
- Grant administrative permissions only to trusted store roles.
- Review customer-facing permissions before launching Quick Order Forms or other account tools.
- Test with a non-administrator account after changing role access.
- Keep the built-in administrator role available for recovery and troubleshooting.
Updates, staging sites, and domain changes
Update an installed plugin
- Confirm the new package supports the installed nopCommerce version.
- Back up the database and the current plugin folders.
- Stop or take the website offline if files will be replaced manually.
- Replace the plugin files using the supplied package instructions.
- Restart the application, reload plugins, and allow any included migrations to run.
- Open the eStoreware dashboard, verify the plugin version, and validate its license.
- Test the plugin’s primary workflow before reopening the site to normal traffic.
Move to a different production domain
Add the new production domain in My eStoreware Licenses, deploy the website, and validate each installed plugin from the nopCommerce Licensing page. After confirming the new website is working, deactivate the old domain when it is no longer required.
Development and staging domains
Use a clearly non-production hostname and enable development-domain support when included with the license. Do not publish real keys, customer names, email addresses, installation IDs, or private domains in screenshots.
Troubleshooting
The eStoreware menu does not appear
- Confirm Core is installed and enabled under Local plugins.
- Reload the plugin list and restart the nopCommerce application.
- Confirm the plugin folder name and files were copied completely.
- Review the nopCommerce log for plugin-load, assembly, or dependency errors.
The license is NotConfigured or Never checked
- Select the correct installed plugin and confirm the license key.
- Click Activate Online, followed by Validate License.
- Confirm the server can make outbound HTTPS requests.
- Review activated domains in My eStoreware Licenses.
- If the local record remains stale, clear the local license, activate again, and validate.
The wrong plugins appear on the Licensing page
The current Core behavior is intended to list installed eStoreware plugins only. Reload the plugin list and restart the application if a newly installed or removed plugin is not reflected correctly.
Continue with the Core Dashboard FAQ, return to Plugin Documentation, or contact eStoreware support.
Back to top ↑